Creating a Cloudflare Worker to lazy load images

Chrome now natively lazy loads images and I explore how to do this with Cloudflare's Workers
Some time ago Cloudflare announced that they were making Workers available. More recently, Google has built image Lazy Loading into its Chrome browser. The new loading attribute will speed up your pages in certain circumstances. This is especially useful if you have a lot of images further down in the page.
Lazy loading allows the loading of images that are below the users viewport to be loaded later when they scroll further down the page. As we know a fast page is going to make the visitor much more happy than a slow loading page. It is really easy to implement — just add the following code to your image tags:
<img src="path/to/you/image.jpg" alt="my fab image" loading="lazy">
So with these things in place I thought it was time to try a little experiment by combining the two.
Setting up and publishing the workers
I use Cloudflare for this site to help with bandwidth and speed. Now Cloudflare have added the ability to create Workers on their CDN. This has delicious prospects for implementing SEO fixes and test on sites
I found that Workers were not as simple to set up as I hoped. There are tools to help though including Sloth. from Salt Agency. to help you write them. I opted to use an interface to help me do the work and manage the modifications so I used Spark. from Strategiq..
Setting up on Cloudflare
First I needed my website to be on Cloudflare, which it has been for some time. Cloudflare Workers started at $5 a month but Cloudflare have now dropped this charge for the first 100,000 daily requests. Luckily, my site just pops in under that.
Setting up the modification on Spark
Ilogged into Spark and choose my site and then went to the Modifications tab and chose New Modification.

Step 1. Basic information
- I named my Modification as ‘Lazyload’ as it seemed appropriate.
- For the type I chose Element Attributes.
- For the URL pattern I chose one page on my site I wanted to test this on.
- For the Experiment, I left it at 100% as I want this to be permanently on. This is a useful feature though for some experiments!

Step 2. Modification Setting
- Element Selector — my Gallery images have the class ‘.galleryimage’ and I chose that as the target.
- Attribute name — loading
- Position — this is where it ads the attribute I chose Append
- Content Template — a lot more complicated than it sounds. This is where the attribute content goes. In my case I want the image to load lazily so ‘lazy’ goes here. The scripts use this field to populate the attribute. You could have a variable here as Chris Green has written in an excellent article about adding alt text at scale. I wanted the same attribute value everywhere so ‘lazy’ it was.
I then saved my Lazyload modification and set it to Live.

Step 3. And publish!
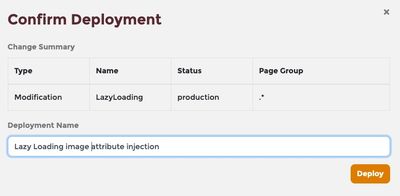
Back in the Sparks Overview page I was then presented with new deploy section.

I hit the Deploy button and named the deployment, good for housekeeping later, and I was done!

I tested the page and there, in the source, was the new image attribute! You can see the page tested on my Ding Dong Moor scratch built Railcar article..

I later changed the URL pattern to .* to cover the whole site.
Conclusion
As I mentioned I could have made this change on my site in one template in a few seconds but this exercise has shown me a quick way to inject attributes across large sites at scale and can be a really useful way to quickly implement or test some technical solutions without resorting to overbooked development resource.
Once a fix like this is in place you can pull together a business case to get the fix in permanently and while you are waiting for the resource slot in the queue, you have already put into place a tactical strategic solution!
Of course this only works with Chrome at the moment and that needs to be taken into consideration. Edge will follow soon. However, it does not slow down any other browser and Chrome amounts for most of my traffic — so I may get a bit of an advantage for a while.
I have not tested loading times on any of my pages as that is outside of the scope of this experiment — but I do expect the initial page load to be faster!
Thanks
I’d like to thank StrategiQ’s Simon Thompson for helping me with this as I had come a bit unstuck at one point!
Next post: Creating buildings from laser-cut 2mm MDF and card
Previous post: Pludgebanging words into Google


