Building a New Log Store: Plans and Materials List

We had a Nordpeis Duo 2 wood burning stove installed some years ago and it looks fab! We use it to keep warm on those days when it is a touch cold but not cold enough to turn the heating on. Of course it gives out a tonne of hygge as well so also gets lit sometimes when it isn't even that cold!
The firewood logs we source locally, but sometimes have to go to a national supplier when local stock is low. Birch is generally our favourite as the bark acts a bit like a firelighter so we don't have to use kindling. The logs from the national supplier arrive in a packed crate and I have been using these as a store. Up till now. Properly stored firewood dries 30% faster so building a log store had to be done.
Key Takeaways
The key to building an effective log store is proper ventilation.
Research shows that firewood needs to reach below 20% moisture content to burn efficiently, and well-ventilated storage is essential for achieving this. According to woodburning best practices, air circulation on all sides—including underneath—prevents moisture buildup and reduces seasoning time by up to 30%.
"A log store raised 300mm off the ground with slatted sides provides optimal airflow from all directions," making it significantly more effective than ground-level storage.
How to build a log store
The steps I took in the build of this log store
Step 1: Create a plan for your log store.
Step 2: Build a materials list.
Step 3: Clear the ground.
Step 4: Build the log store base.
Step 5: Install the upright posts.
Step 6: Add the panelling.
Step 7: Construct the roof.
Step 8: Paint it black.
Step 9: FAQs.
Step 10: Review of mistakes.
Step 11: Update 2024/08/29 – log delivery.
Step 12: Update 2024/10/18 – front overhang.
Step 13: Update 2025/05/31 – Disaster!
Planning the firewood log store
The floor size of the crates is 800mm by 1200mm so that seemed a reasonable size to ensure I could fit a full load into one half of the log store.
The height of the crates are 1200mm also, but I wanted a taller store, with higher floor so that I didn't have to bend down so far. Getting logs out of a crate is always a bit of a pain!
When I started researching materials I found that a sheet of Sterling Board (OSB) is 1200mm x 2400mm. I realised I could use that for the size of the roof - no cuts needed. The golden ratio for my log store dimensions is 2:1 length to depth, which maximizes storage while maintaining structural stability.
The design has two bays with slatted sides and floor to let the air circulate to keep the logs dry and that improves burning efficiency. The roof, as explained, is a single sheet of OSB covered in roofing felt and has a trim around it for appearance. The floor is about 300mm off the ground to provide good all round airflow and less bending down!
The six support posts are 100mm square and the planks 22mm x 100mm. The floor width is 800mm deep to the back which is the same as the crates.
In total the width is about 2500mm and the depth is about 1200mm and the height 1800mm. This should hold just over a cubic meter in volume of firewood in each bay. That's about a third of a cord in old measurements.
These are the plans which I drew up full size in Affinity Designer. I was able to think through the production process as I drew these up which will have saved time and money.
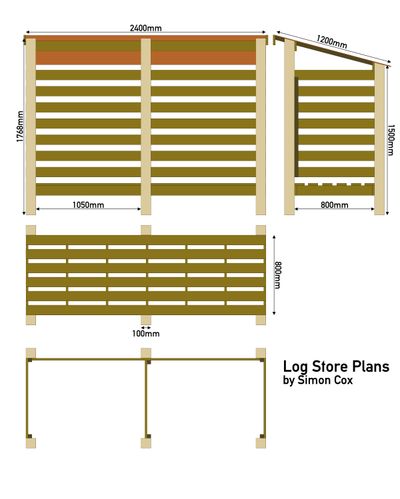
Download the log store plan as a PDF
Materials list for the project:
Most materials were sourced online from a local timber merchant and delivered.
Material
| # off | Material |
|---|---|
| 10 | Sawn 100mm x 100mm HG Post Celcured 1.8m |
| 1 | O.S.B. 9mm (Grade 3) EN 300/ BS 5268-2 2400 x 1200 x 9mm |
| 1 | Rigipaq (ELH) Clout Felt Nails (Galvanised) 0.5kg 13mm ClamPack |
| 1 | Antitear Polyester and green mineral top felt 20kg (10m-1m) - shed felt |
| 1 | EVO-STIK Sticks Like Sh*t Adhesive |
| 22 | Sawn Carcassing Celcure Treated 22x100 4.8m |
| 2 | Sawn Carcassing Celcured 38x38 4.8 |
| 2 | 4 x 40mm Concept KTX Bronze Nano Coated External WoodScrews 200 in a box |
| 1 | Paint Cuprinol One Coat Sprayable Fence Treatment Black 5 Litre |
| 1 | Delivery |
| Cost | £423.79 |
Day one of the log store build - readying the area
I had to empty and move the crates to another part of the garden to start this project. I then cut back the overgrown hedging behind where the crates were and cut back high enough to give myself room to work on the back of the store. Lot of holy in there which got its own back on me a few times.
I have sited the log store so that the open front is facing east. We have a prevailing west wind here so this shelters the store, and when we do have an east wind, and it is always cold, the house protect the log store from the weather.
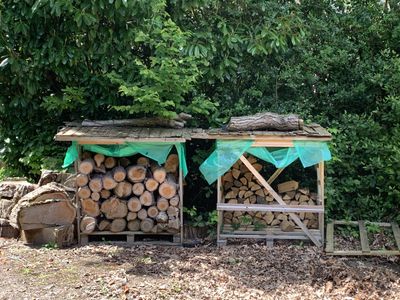
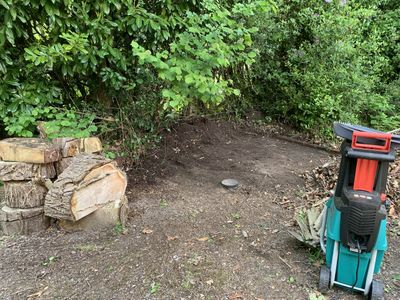
There was about 3 ft back to the fence line that was soil - more a matt of ivy roots than soil. I suspected about 5 inches under this was the drive tarmac and I was right. We had already doubled the size of our drive by removing grass and top soil that had been laid by the previous owners many years ago. This allowed me to site the new log store a good foot back further than I had planned.
The ivy roots were so matted that I used a rotavator to mash it all up for easy shovelling. We chipped the removed branches down and used them for path dressing in other parts of the garden.
The wood shipment arrived and I was ready to begin the build in earnest.
Day two of the log store build - construction
The base
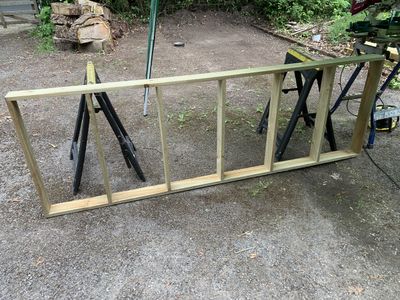
Pressure-treated timber lasts 15-20 years outdoors compared to 3-5 years for untreated wood. All the wood I chose was pressure treated even though i planned to paint it. I began by putting together the floor using corner clamps to ensure it was square. I used exterior grade screws to join all the woodwork rather than nails. With a battery powered screwdriver drill this does not take long.
The posts
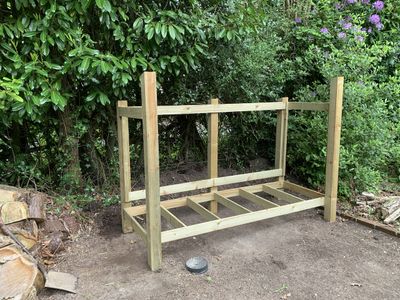
I then cut the tops of all six posts at a 15 degree angle for the roof slope and marked up where the floor and planks would go. Marking them up at this stage was easier than trying to do that later.
Battens for the planking were then cut and screwed onto the posts as in the plan. These allow the side planks to be flush with the posts on the outsides whilst in the middle I lined them up to one side. This does mean that the left bay has a tiny bit more capacity but you would never know.
Next I laid out the three back posts on the ground. The floor frame was then attached to the first leg, squared up and screwed together. This was then followed with the middle and last back leg.
I then added the top side planks to provide support for the front outside legs and then added the front side legs. The middle front leg would have to wait until the framework was upright and in place.
We tipped up the framework and moved it into its final position, which did cause a little bit of swearing! After some squaring up side planks were then screwed in with a single screw at each end so we could make minor adjustments.
I sat the posts on spare roof tiles to prevent moisture getting into them. Most of the tiles cracked as soon as i put weight on them but the legs are off the ground.
The panelling
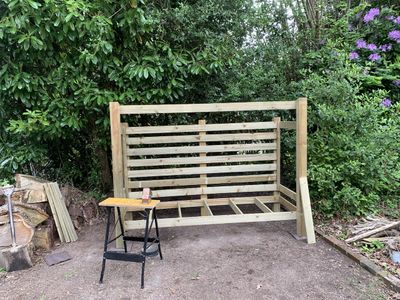
Once I was happy with the positioning of the posts, we added some square profile batoning to the insides of the posts for the planking. The planking was cut to size and screwed into place providing the whole structure a lot more solidity. I had measured out the planks and the gap we need to cover so that I could cut two blocks of wood as spacers to ensure we had the evenly spaced gaps. I read somewhere that using spacer blocks to maintain consistent gaps is the difference between amateur and professional results. Not sure that makes me a pro though!
These gaps, in the back and side walls and the floor, let the air circulate freely in the log store keeping the logs dry which means they burn longer and more efficiently.
We put the back panels on first followed by the sides and central panels. We needed somewhere to stand whilst doing this so added the floor panelling last.
The roof
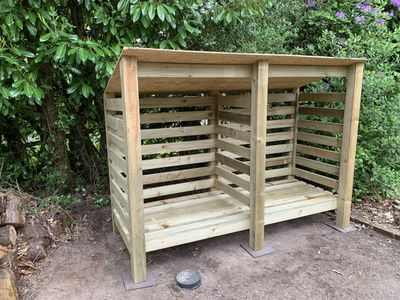
We had thought of cedar shingles for the roof as we have used them in projects before but the roof slopes away so we wouldn't even see them! OSB was then laid on top, squared up and screwed down.
To make the roof waterproof two strips of roofing felt were then cut to size and tacked on with felt nails. I used Sticks Like Shit glue to seal the top sheet. Side facias planks were then cut with the 15 degree angle and screwed on slightly above the roofing felt. Finally the front facia board was then lined up with the sides and screwed in place. There is enough overhang at the back to allow rain run off to drip down and miss the dry logs! done.
Day three of the log store build - paint
The log store looked great in natural timber colour but we have tended to paint wooden things in our garden black. This is because we used to have a small Japanese style garden and black helped the foliage and bamboo visually pop.
Several years ago I purchased a compressor on wheels along with a spray gun but had not had the chance to use it yet. I'm not a novice with an airbrush having used them in commercial endeavours and for modelling but I had not used one so large. Turns out is as easy if not easier! Spray application achieves 30% better coverage than brush application for slatted structures and it is so much quicker.
I had bought some sprayable black fence paint and it did not take long to get a good coat on the log store. Sprayed paint also dries quicker than brush applied paint so I was able to get several coats on in a short amount of time. The bonus was it was not as messy as painting with a brush, managed to avoid any drips!
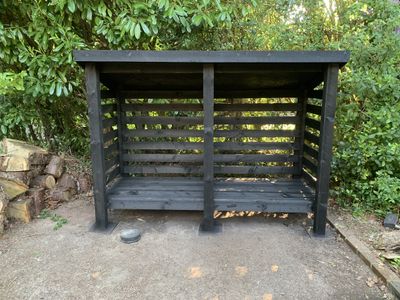
And that was it - loaded it up with logs from the tree we had felled in one side, they will need splitting this year. The remains of the last kiln dried log shipment in the other.
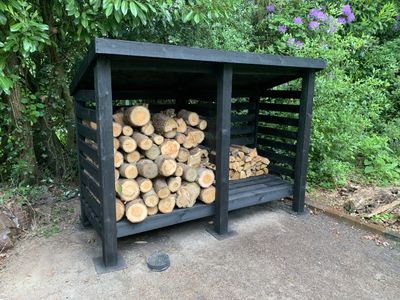
We are vey happy with this log store. We could have bought a kit, cheaper timber and somewhat smaller, for the same price but this is unique.
The slatted panels and floor give great air ventilation that allows the firewood to dry out. We need the wood to be below a 20% moisture content for it to burn effectively and we often bring a stack in to the porch and keep a stack next to the log burner to further dry out.
And there is some wood left over. I did over-order because despite measuring twice and cutting once I still make mistakes... So the bins needed a place to go so I have written How to build a bin store...
Frequently Asked Questions About Building a Log Store
How much does it cost to build a DIY log store?
My custom-built log store cost approximately £400-450 in good quility materials for a structure holding 2+ cubic meters of firewood. This compares to £300-350 for smaller kit versions with less than half the capacity that you can buy online or at your local garden superstore.
How long does it take to build a log store?
This one took me three days but I wasn't pushing it hard. If you are younger than me then able typical DIY log store can be built in 1-3 days:
My timeline for this:
- Day 1: Site preparation (4-6 hours)
- Day 2: Construction (6-8 hours)
- Day 3: Finishing and painting (3-4 hours)
What wood should I use for a log store?
I used Pressure-treated timber as it is essential for log store construction, even if you plan to paint it to ensure longevity. Research shows untreated wood deteriorates within 3-5 years, while pressure-treated timber lasts 15-20 years or more.
Do log stores need a base?
Yes, elevating your log store 200-400mm off the ground is crucial for proper ventilation and longevity. Ground contact is the primary cause of premature rot in both the structure and stored firewood. i also cleared a lot of the vegetation behind the store to encourage air flow.
Should log stores have a roof?
A sloped roof with overhang is essential for protecting firewood from rain. Studies show that uncovered logs can absorb 40-50% more moisture during wet weather, significantly reducing burn efficiency. The overhang helps with keeping out driving rain.
What direction should a log store face?
Position log stores with the open front facing away from prevailing winds. In the UK, this typically means facing east or south-east, reducing direct rain exposure by up to 70%. Mine faces east, and the house, which was fortunate!
How do you keep wood dry in a log store?
The three principles for keeping firewood dry are: elevation, ventilation, and roof protection:
- Elevate logs 200-300mm minimum off the ground
- Ensure 20-25mm gaps between slats for airflow
- Provide 150-200mm roof overhang at the front
How much firewood fits in a log store?
My design holds approximately 2.2 cubic meters (0.73 cords) across two bays, with each bay holding 1.1 cubic meters. When we get a full delivery not all of it fits the store so some has to go in the house but that's ok as it helps dry it out and i don't have to go outside to top up.
Things I wish I had done differently
It is always good to reflect on how a build goes and makes some notes in case you have wood left over and some ideas what to do with it.
- I think I should have used a thicker roof felt.
- I should not have cut the roof felt on the grass - not sure why but a patch of grass died off where I had it laid out for 20 mins. It was a hot day so that might have been why.
- As always I wish I had spent a little more time measuring things out - but it's not marquetry on a bureau so is more than good enough!
- I wish I had used my air compressor and spray gun for painting things sooner - it is great!
Update 2024 August 29th
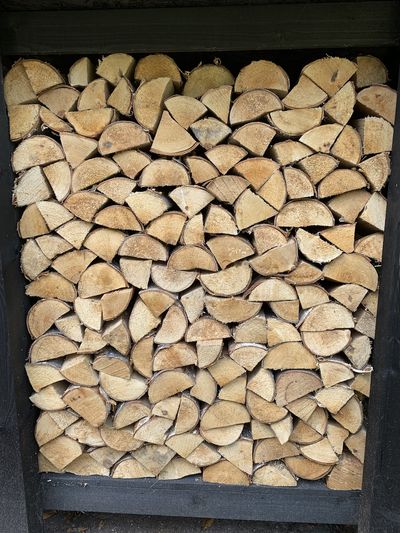
We had our first delivery of logs since building the store. I was not able to purchase the normal amount that the store was designed for so had to get in a larger load - which of course filled it right up. I will have to stack the remainder in the porch and use that up first.
Update 2024 October 18th
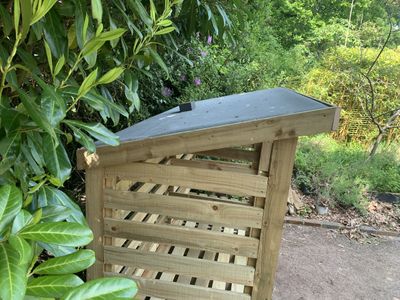
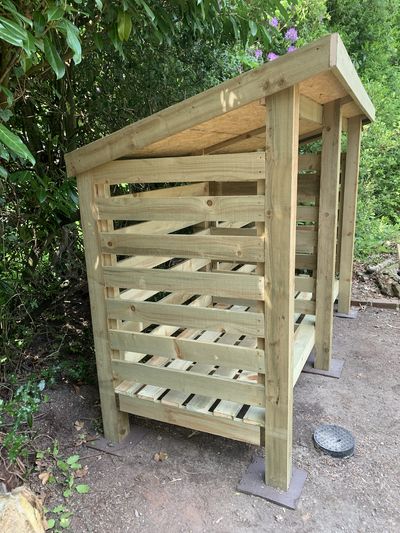
Angela Henson asked me on YouTube what overhang I left at the front. I can't remember the exact measurement as the roof is an as delivered OSB Stirling board - no cuts on that at all. The back has a small lip but most was at the front. You can see how much that was and some other construction details in the photo below. We have had some very heavy rain this year and so far the wood has kept dry!
Update 2025 May 31st
Disaster! I could see a white line on the floor panel On investigation I discovered that the weight of the firewood had snapped the screws I had used to attach the floor panel to the back right and middle legs.
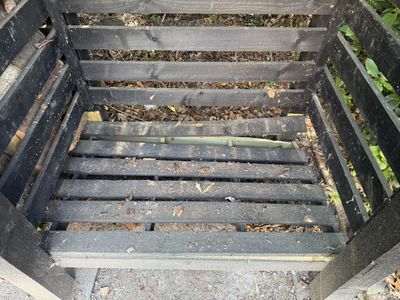
The fix
Having removed all the wood from the log store I clamped the floor to its correct position and put some much bigger screws in. I then added some cross pieces onto the legs for extra floor support. These were from offcuts of the builds - always have a few offcuts around!
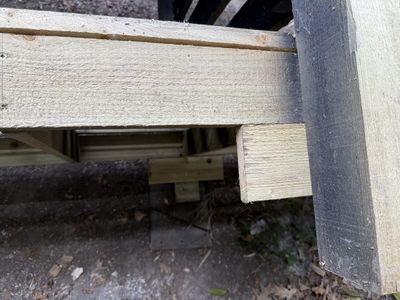
On reflection I probably don't need the extra supports so I have not updated the plan but the bigger screws are a must!
I had yet to paint them when I took these photographs of the fix.
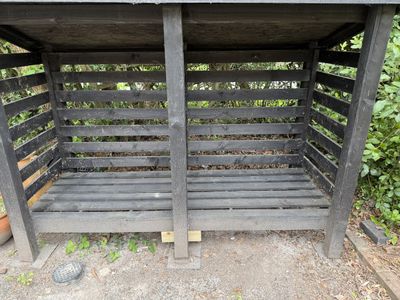
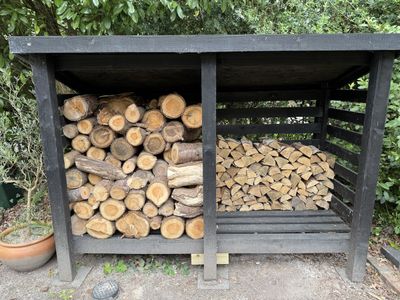
Look how grubby it has got already with the rain splashing dust up the legs!!
Update 2025 Nov 5th
I have added the Key takeaways, the FAQs section and rewritten a couple of places for clarification, all especially for bonfire night!
Next post: Then I built a new bin store!
Previous post: Do invisible characters in your code cause issues with search?


